
by Pronk Precision
Service Globally
203-269-0090

AccuArm Simulation Accessory
Using the AccuArm w/ AccuPulse Handheld
This guide is meant to supplement the AccuPulse User Manual (available for download on www.clinicaldynamics.com) and will help the user connect, configure and run Non-Invasive Blood Pressure (NIBP) simulations on the AccuArm NIBP Simulation accessory. The AccuArm allows the user to simulate NIBP on wearable vital signs monitors and other special purpose patient monitors with closed/inaccessible pressure systems.
In preparation of an NIBP simulation, the Device Under Test (DUT) or pressure cuff is wrapped around the AccuArm. It is then inflated by the AccuPulse to a base pressure of ~30mmHg where it will await the NIBP cycle of the DUT. The DUT inflates the cuff around the AccuArm's pressurized flexible volume. This allows the AccuPulse to actuate the air inside the AccuArm to produce an Oscilloscope Pressure Pulse envelope which is then detected by the DUT; producing repeatable NIBP results.
Getting Started:
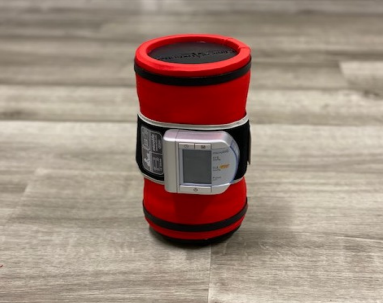
1.) Wrap the Device Under Test's cuff around the AccuArm.
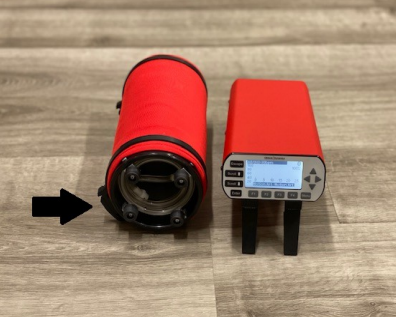
2.) Locate AccuArm's pressure tubing inside it's base.
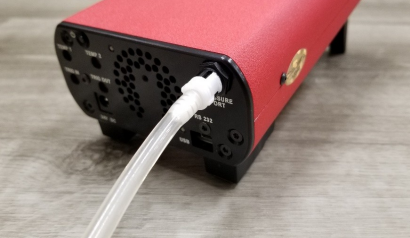
3.) Attach the twist-lock connector of the AccuArm's tubing into the AccuPulse's Pressure Port located on the rear of the system. The AccuPulse can be used plugged into the AC adapter, or on it's internal battery if charged.
2.) On the rear of the AccuPulse, press the power button to boot up the system. The unit will show a splash screen depicting model info, serial number, software version....etc. After the splash screen clears, the AccuPulse main menu will appear, as shown below. Allow the unit a few moments to warm up.
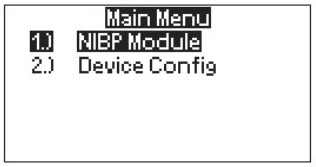
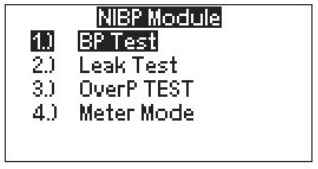
3.) From the Main Menu, press the **ENTER** key to bring up the contents of the NIBP Module menu. Options for the built-in AccuPulse BP, Leak, OverP and Meter Test Modes are displayed. BP Test should be selected by default.
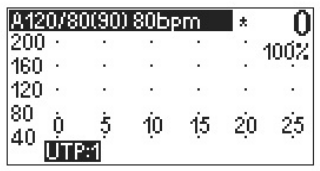
5.) Press the **ENTER** key to enter BP Test Mode. The BP Test Mode screen will appear; a chart
showing pressure vs. time with the current pressure reading in the top right corner (As shown below).
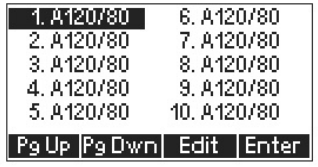
6.) Once inside the BP Test Mode, push **MENU** to open the User-defined Test Point (UTP) menu. This screen displays all the available UTP simulation presets that are configurable by the user. From this screen, the user can adjust the individual simulation presets to desired test parameters. By default, all the presets appear as Adult 120/80.
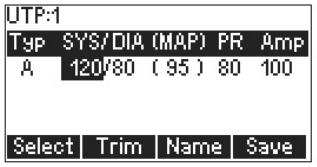
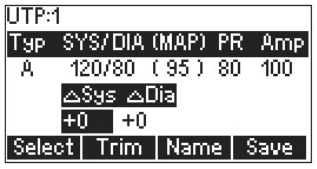
7.) Use the arrow keys to select a preset, then push **F3** to edit the selected point. The UTP edit screen will appear as below. From this screen, the user can change “Typ” to be either A for Adult, or N for NeoNatal simulation mode. “Sys/Dia” is the Systolic and Diastolic blood pressure simulation settings, this can be adjusted according to the desired test parameters. MAP (mean arterial pressure) is automatically updated to reflect the changes in Sys/Dia. “PR” stands for Pulse Rate; the number of pulses per minute the simulator will produce during an active NIBP simulation. “Amp” represents the amplitude of the pulse, 100 is full strength.
8.) If a user wants to Trim the current settings to more finely tune a simulation result, press **F2**. The Trim menu will appear and let the user adjust the +/- individual trim factor for the Systolic and Diastolic pressure settings.
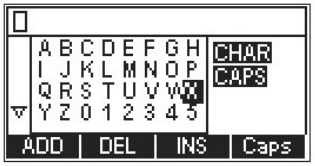
9.) If a user wants to name the preset for ease of use or future reference, press the **F3** button to bring up the text selection screen, shown here:
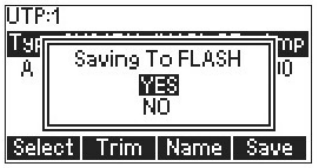
10.) After the user configures the simulation preset to the desired settings; Systolic/Diastolic, Trim, Name, Amp, the user has to press **F4** to save all the current settings under the chosen preset from Step #7. A pop-up will appear (shown below) to ask the user to confirm the save. Select “Yes” and press **ENTER**
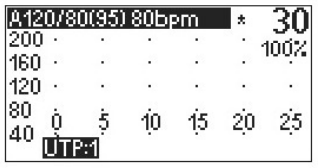
11.) Once the preset is configured and saved, the user can press **MENU** or **ESCAPE** to return to the BP Test Mode screen from Step 5 in order to initiate an NIBP Simulation. While on the BP Test Mode screen, the AccuArm needs to be primed in order for a NIBP Simulation to occur.
Press the **F4** button to prime the AccuArm with its required base pressure. The AccuPulse's pump will start and inflate the connected AccuArm to 30mmHg. The AccuPulse will open and close it's check valves a few times to ensure a static 30mmHg is achieved. The BP Test Mode screen will look like this:
12.) The user is now ready to direct the Device Under Test to begin an NIBP Test. The AccuPulse will produce the required pulses at the correct pressure to generate the desired simulation setting. If the user chooses to re-run the selected preset or a different one, the AccuPulse will stay at the 30mmHg primed state until the user disables the pump and opens the valve by pressing **F4**. The user should do this to release any pressure in the system if the AccuArm needs to be disconnected or if the AccuPulse needs to be powered down.